

“This Inventory Management App Guide provides practical steps for using iReap POS to build an accurate inventory management system—from goods input to daily stock monitoring and routine stock-taking. It features real-time stock visualization, automated reports, and minimum stock level alerts.”
If we compare a business to the human body, then sales would be its breath. Yet, at the heart of it all lies one vital organ: Inventory Management.
Why do I call it the heart? Because here is where your business’s “lifeblood”—your capital—resides in the form of products. And like a heart, it must stay healthy. When inventory gets stuck, so does the flow of your capital.
There are three chronic ailments that often afflict this “heart”:
- Phantom Stock: The shelves are empty, but your system says otherwise. Items are either lost, damaged, or misrecorded.
- Dead Capital: Unsold goods pile up, gathering dust or even expiring—your money trapped inside.
- Restocking Confusion: You want to replenish stock, but don’t know what or how much to order—decisions end up being guesswork.
In our comprehensive iReap POS guide, we highlighted that inventory management is one of its core strengths.
Now, let’s move past theory. It’s time for practical steps—a complete, hands-on walkthrough. Fire up your iReap POS app. Let’s begin.
Foundational Principle: Goods In, Goods Out
Before clicking any buttons, remember this golden rule: Goods In, Goods Out.
No matter how advanced a system is, its reports are only as accurate as the data you enter. So invest a bit of time and precision up front. That small effort now will save countless hours and costly mistakes down the line.
STEP 1: Entering Product Data – Creating a “Birth Certificate” for Every Item
Think of this step as issuing an identity card for every product. Each one needs a clear, traceable identity.
Open iReap POS. On the main screen, locate and click on the “Items” menu or icon. You’ll see your product list (likely still empty). Click “+” or “Add New Item”.
Fill in Key Details (Required Fields)
These are critical and must be entered correctly:
- Item Code / Barcode: This is the product’s national ID number. It must be unique.
- Have a factory barcode? Great! Tap the field and scan it with your phone camera. “Beep!”—done.
- No barcode (e.g., homemade cake)? No problem. Create your own code, e.g., ‘CAKE-CHOC-01’.
- Item Name / Description: Be specific. Don’t just write “Instant Noodles”—use “Indomie Fried Noodles Special 85g”. This helps you and your staff locate items easily.
- Purchase Price (COGS): The cost you pay to the supplier. DO NOT skip this. It’s essential for the system to calculate profit.
- Selling Price: The price you charge your customers.
- Category: Organize your inventory, e.g., “Beverages”, “Snacks”, “Personal Care”. Useful for sales reporting.
Fill in Inventory Information (The Control Center)
Now, input the physical details:
- Current Stock Level: This tests your accuracy. Manually count items on shelves and in storage, then enter the number here—this is your opening balance.
- Minimum Stock Level: This acts as a smart alarm. Set a threshold. For example, if you want a warning when Coca-Cola drops to 6 bottles, enter ‘6’.
Pro Tip: If you’re managing hundreds or thousands of items—like a grocery store—you can use the “Import from CSV/Excel” feature. Prepare the data on your PC and upload it in bulk.
Once everything is filled in, click “Save”. Congratulations! You’ve officially registered one product. Repeat for the rest.

STEP 2: Daily Stock Monitoring – Let the System Work for You
Now comes the rewarding part. After your initial hard work, the system takes over.
How Does Stock Automatically Decrease?
Each time a sale is made—say a customer buys two packs of “Indomie Fried Noodles Special 85g”—the system automatically deducts two units from inventory. You don’t lift a finger. Simple, right?
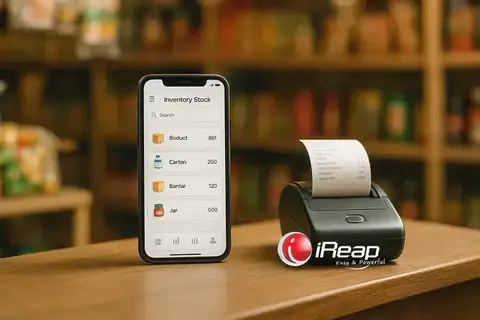
Check Inventory Anytime, Anywhere
Curious how much sugar you have left? No need to ask staff or walk to the storeroom. Just:
- Open iReap POS.
- Go to “Reports”.
- Choose “Stock Report” or “Stock Balance”.
You’ll see an up-to-date list of all items and their quantities. Use the search bar for quick access.
Leverage the Low Stock Report
Remember the alarm we set earlier? To see which items have triggered it, go to Reports → Low Stock Report.
This acts as your auto-generated shopping list. Simply contact your suppliers and reorder.
STEP 3: Stock Opname – Verifying Reality
The real world is messy. Sometimes goods arrive damaged, go missing, or get misrecorded.
That’s why you must routinely align your system’s data with physical stock. This is called Stock Opname.
Don’t worry—iReap POS makes it easy:
- Print Stock List: Go to Stock Reports and print (or export to Excel) your current inventory.
- Count Physical Stock: Take the list and walk through your store and warehouse. Count each item manually and jot it down.
- Compare and Adjust:
- If there’s a mismatch—say the system shows 10 bars of Soap A, but you only have 9 (one was damaged)—you’ll need to adjust.
- Use the Stock Adjustment feature in iReap POS. Enter “Soap A” and input ‘-1’. Now the system reflects reality.
Do this regularly—monthly, for instance. It keeps your business “heart” healthy and your data reliable.
For more advanced reporting, note the differences between iReap POS Lite and Pro.
Conclusion: From Guesswork to Precision
As you can see, inventory management isn’t rocket science. It’s a discipline. And with the right tool—like iReap POS—it becomes a breeze.
You transition from making gut decisions to managing your business with DATA.
You’ll know when and what to reorder—and most importantly, your capital won’t be locked away in unsold goods.
Now it’s your turn.
Ready to Take Full Control of Your Business’s Heart?
Don’t let unmanaged stock drain your profits. Start digitizing your inventory today—easy, effective, and free to begin.
CLICK HERE TO DOWNLOAD THE iREAP POS APP AND START MANAGING YOUR STOCK SMARTER!

